Installing a diesel heater through the floor of a van
A split diesel heater is only as safe as its install. This guide walks through the floor-mount layout most kits are built for, from where the heater sits to where the exhaust ends up, so you know what a good job looks like before you drill.
How a split heater works in a van
A split heater sits inside the van and burns diesel in a sealed combustion chamber. Combustion air comes in from under the floor through one pipe, and the exhaust leaves under the floor through another.
Cabin air passes over the outside of a heat exchanger and comes out warm without ever touching the flame. That separation is what makes a diesel heater safer than any open flame in a van, as long as the pipes stay sealed.
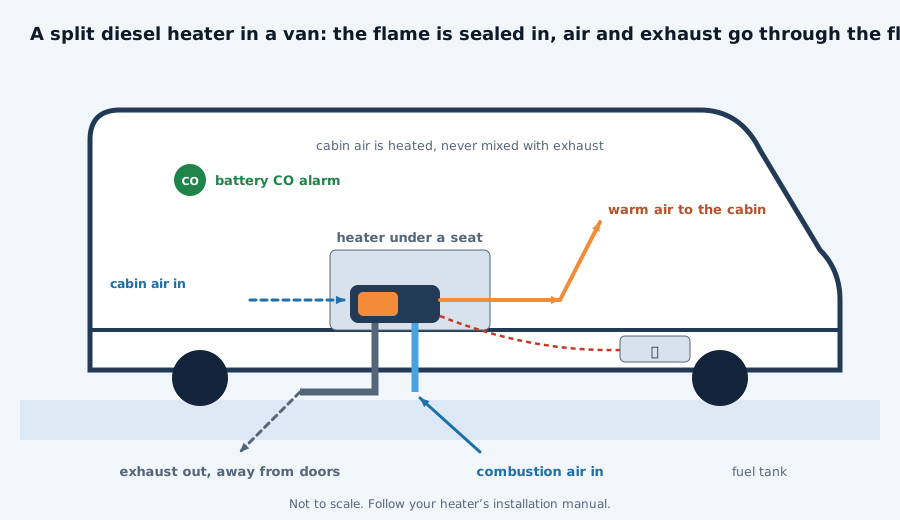
The drawing shows the usual layout. The heater sits under a seat, with its pipes through the floor and a fuel line running back to the tank.
Before you drill
Read the heater’s installation manual first and keep it open at every step. Kits differ in hole sizes, pipe lengths and clearances, and the manual is the only source for those.
Then get under the van with a flashlight. Find the frame rails, brake lines, fuel lines and wiring looms near your chosen spot, because the holes and the hot exhaust must stay clear of every one of them.
- A flat patch of floor big enough for the mounting plate
- Open space below, with no fuel tank, brake line or spare wheel right underneath
- A path for the exhaust to point out to the side, away from the sliding door
- Room for the dosing pump close to the fuel source
- A short cable run to the house battery
Mounting the heater
Most kits bolt the heater to a flat floor plate, with a gasket between heater and floor. The gasket seals the combustion side from the cabin, so never leave it out or reuse a torn one.
Under a passenger seat or bench is the classic spot, since it keeps the heater low and the pipes short. The Espar listing says the AS3 is compact enough to fit there.
A ribbed floor needs a spacer or a bracket shaped to it. Any gap under the plate is a path for exhaust back into the van, so close it the way the manual describes.
Exhaust and combustion air
The exhaust is the part that can kill you, so give it the most care. Route it below the floor to the silencer, then to an outlet that points away from the van and well clear of doors, windows and the intake.
The exhaust pipe runs very hot. Route it away from fuel and brake lines, cables and anything plastic, and use the kit’s clamps and brackets so it cannot shake loose on a rough road.
The combustion-air intake gets its own short pipe below the floor, facing away from the exhaust. Never let the heater draw combustion air from inside the cabin, and keep both pipe ends where snow and mud cannot block them.
Owners who sleep near the heater often fit a second silencer on the intake. That trick and a few others are in our guide to a quieter diesel heater at night.
Fuel line and dosing pump
The dosing pump meters diesel to the burner one small pulse at a time. Mount it close to the fuel source and angled upward, usually 15 to 35° per the manual, so air bubbles pass through instead of collecting.
Rubber-mount the pump, since a pump bolted hard to the body turns the van into a drum for its ticking. Keep the fuel line short, clipped down and away from the exhaust along its whole length.
Fuel can come from a standpipe in the van’s own tank or from a separate tank. Each route has trade-offs, which our guide to feeding a diesel heater lays out.
Wiring and the controller
Run the power cable to the battery with the fuse the kit supplies, clear of the exhaust and any sharp edges. A thin or overlong cable starves the glow plug at start, a common cause of failed starts.
Mount the controller where you can reach it from bed. Never switch the heater off at the battery or a breaker while it runs, because it needs power to finish its cool-down purge.
Ducting and warm air
The warm-air outlet needs a free path into the cabin. Keep ducting short with few bends, and never block the cabin-air inlet, since a starved heater can shut down on overheat.
Aim the outlet toward the floor or the middle of the van rather than straight at the bed. Warm air rises on its own, and a gentle flow low down warms the space more evenly.
Budget kit or premium kit
The Espar kit includes the dosing pump, a stainless exhaust, intake pipe, silencer, ducting and fixings, but no tank standpipe or fuel filter. Budget kits such as the VEVOR 8KW split ship with a 10 L tank, controller and silencer, and owners say the manual is poor.
Inspect a cheap kit’s hardware before it goes in. Look over the exhaust pipe, clamps and gasket, and replace anything thin or badly made rather than trusting it under your bed.
Checks after the first run
- Run the heater on high with the doors open and watch for smoke or a fuel smell inside
- Check under the van that every exhaust joint is tight and nothing near the pipe gets hot
- Fit a battery CO alarm in the sleeping area and test it
- Recheck clamps and fuel joints after the first few hundred miles
A separate CO alarm is not optional, as our carbon monoxide guide explains, and the wider habits are in our nine safety rules. If any step leaves you unsure, pay a qualified installer to do at least the exhaust.
To choose the heater before you plan the install, see the diesel heaters for vans compared on our homepage, with each kit on its card under the picks and the tips before you buy.
For a first install on a budget
The VEVOR 8KW split arrives with its own 10 L tank, a silencer, controller and remote, plus automatic altitude compensation to 18,045 ft. Owners find the manual weak, so check the exhaust hardware and follow the layout above.